If you’re looking for a guide on how to connect a Brother printer to a Mac but don’t know where to start, this guide will help. You are in the right place. Whether you are new to using printers, setting up devices, or working with macOS, this guide provides a step-by-step explanation in simple terms.
Recently, my aunt decided to set up a Brother printer to work with her new MacBook. She followed the printer’s quick-start card instructions but quickly realized that her Mac didn’t recognize the device automatically. Unsure what to do next, she tried connecting the printer through a USB cable, but it still didn’t show up in the printer list.
Like her, you may need to download and install the correct printer driver or choose the right connection method. This guide will cover all of that. Whether you’re connecting through Wi-Fi, USB, or Bluetooth, you’ll find step-by-step instructions here. By the end of this guide, your printer will be fully connected to your Mac and ready to use.
How to Download & Install Brother Printer Driver for Mac?
You need to download the correct drivers for your printer model on your Mac from Brother’s official website, especially if you’re using the printer for the first time while learning how to connect a Brother printer to a Mac.
Step 1: Go to the official Brother support site (support.brother.com), input your printer’s name, and navigate to the computer’s Downloads section.
Step 2: Select the Downloads link, then Mac, and then select the correct OS (macOS) for your device. Tap on the OK button.
Step 3: Click on Printer Driver, read the End User License Agreement, and click “Agree to EULA and download.”
Step 4: Once downloaded, open the file and complete the steps displayed on your screen to install the driver.
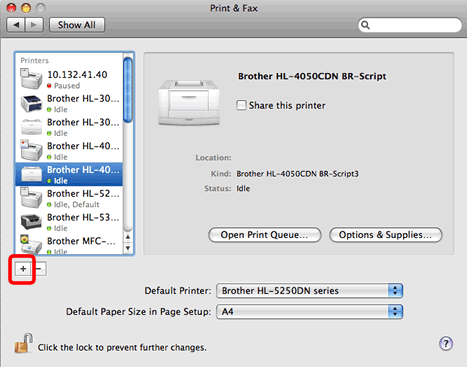
Step 5: Go to “System Preferences” and then navigate to Printers & Scanners.
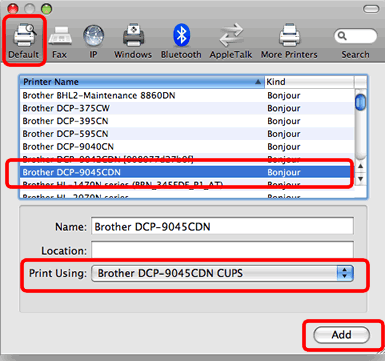
Step 6: Click on the Add icon and select your printer from the list.
How to Connect Brother Printer to Mac Through Printer’s Control Panel?
Turn off your printer and disconnect it from the power cord. If any interference cables are connected, unplug them too. Now, follow the instructions given below for seamlessly connecting:
Step 1: Go to the printer’s Control Paneland scroll to Network.
Step 2: Press OK, then press OK on the WLAN option.
Step 3: Now, scroll to the Setup Wizard option, then press OK.
Step 4: Use the navigation keys on your printer to turn on the Wi-Fi.
Step 5: Find your network and click OK.
Step 6: Use the up and down arrow to enter your password, then click OK.
Step 7: Press the down button to choose Yes.
Step 8: After a successful connection, click OK.
Step 9: Go to the Apple menu and navigate to System Preferences.
Step 10: Double-click on the Printers & Scanners icon.
Step 11: Now, click on the Add button on the left.

Step 12: After that, you will be asked to select your printer and click on the Add button.

How to Connect a Brother Printer to Your Mac Using USB?
If you want to connect your printer to a Mac via USB, consider these steps:
Step 1: Turn off the printer, unplug it, and wait for a few seconds before turning it back on.
Step 2: After that, connect the USB cable to the printer’s USB port and your Mac.
Step 3: Click on the Apple menu, then tap on System Settings or System Preferences.
Step 4: Click on Printers & Scanners.
Step 5: Tap on the (+) button.
Step 6: Your printer should appear in the list of available printers. Select it and click “Add”.
How to Connect a Brother Printer to a Mac via Bluetooth?
This is one of the most frequent questions asked by users. But you don’t need to worry about that. Just follow the steps listed below:
Step 1: On your computer, go to the Apple icon and select “System Settings” (or “System Preferences” on older versions of macOS).
Step 2: Click on “Bluetooth” and ensure your Bluetooth is turned on.
Step 3: On your printer’s Control Panel, navigate to Settings, then select the Bluetooth option, and enable it.
Step 4: Look for a Bluetooth option, select it, and make sure to turn it on.
Step 5: After you enable Bluetooth on both devices, your printer will appear in the list of available devices on your Mac’s Bluetooth settings.
Step 6: Now, select your printer from the available list.
Step 7: You may be asked to enter a PIN. The default PIN is usually the last four digits of your printer’s serial number.
Step 8: After that, click Connect or Pair to establish the connection.
Step 9: Once connected, “Connected” should be displayed under the printer’s name in your Bluetooth settings.
Step 10: Open a document and select your printer from the printer list.
Step 11: Print a test page to ensure that the printer is working correctly.
Conclusion
By following the steps described in this blog guide, you’ve successfully connected your printer to your Mac. If you ever need to repeat the process for another printer or help someone else do the same, you can refer to this guide.
Whether you’re using your printer for everyday documents or important personal tasks, this guide will help you learn how to connect a Brother printer to a Mac smoothly.
Frequently Asked Questions (FAQs)
Why Is My Printer Driver Not Showing Up on My Mac?
If your printer driver isn’t showing up on your Mac, it could be due to incorrect installation, outdated software, or potential conflicts. Consider these steps to troubleshoot this issue:
- A simple restart can often resolve minor software glitches.
- If the printer is listed but not working, try removing it and adding it back.
- Check the printer manufacturer’s website for the latest driver for your Mac operating system.
- Ensure you have the latest version of the printer driver installed.
How do I fix My Brother Printer Network Connection?
To fix a printer’s network connection, ensure that the following points are met:
- Power off the printer and router, wait a few seconds, and then turn them back on.
- Verify your computer is connected to the same Wi-Fi network as the printer.
- Ensure the password you’re entering is correct.
- If the printer is too far from the router, move it closer or remove any obstructions that might be blocking the signal.
- Ensure the Wireless Network interface is enabled.
- If issues persist, you can reset the printer’s network settings. Press Menu or Settings, then navigate to Network and select Network Reset.
How Can I Reset Brother Printer Network?
To reset your printer network, you need to follow these steps:
- On your printer’s Control Panel, press the Settings button.
- Using the arrow buttons or touchscreen, navigate to “All Settings.“
- On the following screen, go to “Network.”
- Then, select Network Reset or Reset Network Settings.
- Now, select Yes or OK to confirm the reset.
Finally, the printer will restart, and the settings will be reset to their factory defaults.