Brother printers have all the latest high technology features that make our lives easy. If you have lately been wondering – how do I receive a fax on my Brother printer? Then, we have got you covered. Here you will find the easiest step-by-step guide which will help you to receive a fax on your Brother’s printer.
All printers of Brother already have built-in fax capabilities, which makes them easy for users who want to receive or send faxes. You can, in fact, send a fax in just a couple of minutes by using your printer’s Automatic Document Feeder (ADF), scanner, and PC-Fax feature. If you want to learn to receive a fax on your Brother printer and the common dilemmas related to it, then keep reading to find everything and more.
Will I Be Using A Distinctive Ring Number For Receiving Faxes?
A distinctive Ring Number is basically a service offered by telephone companies. It allows the users to have two different numbers on a single telephone line. This service enables a second telephone number with a unique ring pattern. The original number rings using a standard ring pattern which is used for receiving just the voice calls. At the same time, the second number rings with an entirely different ring pattern and is used for receiving faxes.
The Brother printers use the term “Distinctive Ring.” This term describes the service that was explained earlier. But don’t get confused as the telephone companies may market it under a variety of names—for example, Ring Master, Smart Ring, etc. So, by setting up the Distinctive Ring feature on your Brother printer machine, you choose one of the telephonic numbers specially for receiving faxes.
How Do I Receive A Fax On My Brother Printer?
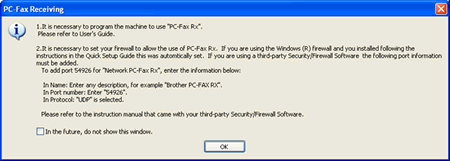
The first thing that you have to do is turn on the FC-FAX feature. By enabling this feature, your Brother printer will store received faxes and send them to your computer system. Just follow the steps given below to receive a fax on your Brother printer:
- First, click on Start.
- Now from All Apps, choose Brothers and then choose Brother Utilities.
- A drop-down menu will appear on your screen from which select the correct model name of your Brother printer.
- Over there, click on “PC-FAX Receive.” And lastly, click on “Receive.”
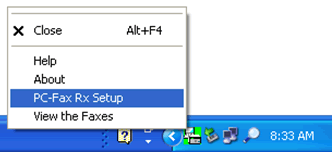
- Once you have enabled this feature, you can start receiving faxes on your Brother printer, and you can view them on your computer.
Will I Be Using My Brother Printer On A Dedicated Fax Line To Receive A Fax?
If you want your Brother printer machine to answer all the incoming faxes automatically, then you should choose the “Fax Only Mode.” The fax-only mode is usually chosen if you have a dedicated fax line. When you use this mode, your Brother printer will automatically answer every incoming call with a fax-receiving tone at the end of a certain number of rings. You can use the Fax Only Mode for outgoing voice calls also, but you will not be able to receive incoming voice calls. One way to solve this shortcoming is by answering the incoming calls before your Brother machine does that. To determine the number of times your Brother printer machine rings before answering in Fax Only Mode, you can make changes in the Ring Delay settings. All you have to do is follow the steps given below to change the Ring Delay setting:
- Press the fax button on your printer to illuminate it.
- Then press the Menu and choose “Fax,” then click on “Setup Receive,” and then choose “Ring Delay.”
- Now choose how many times your printer machine will ring before it answers. Also, the number you can choose varies according to the different printer models and the place you purchased it from. Suppose you choose zero; then, in that case, the line will not ring at all.
- After that, press “Ok,” and lastly, press “Stop/Exit.”
Now to put your Brother printer machine in Fax Mode Only, follow the steps given below:
- Press the fax button to illuminate it.
- Then press the Menu and choose “Fax,” then click on “Setup Receive,” and there choose “Receive Mode.”
- Now choose Fax Only and press “Ok,” and lastly, press “Stop/Exit.”
- Once you do that, the LCD on your Brother printer the date and “Fax.”